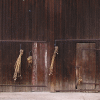
Here is the box, you can see the exhaust for the heater up front with it's own roll cage. The only windows are at the back, so we will cut and install some...great practice :-)

Maggie is prepped and ready.

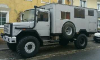
Using an old forklift, they managed to get it on straight, not on the first try, but straight none the less

AWESOMELY the box is designed for the truck itself, so we were able to use the shelter mounting points and chain tie downs that were already there. (ya...it was 35 degrees and raining slush)

It is really great to see things progressing again...I need a grinectomy

So there she is...we are going to leave the drop sides on for now since it gives us a little storage front and rear (front storage is 1 stinking inch short of holding a Jerry can long ways...1 stinking inch).

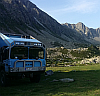
Sorry for the dark photos, I get off work at 5, sun sets here at just after 4...
As it sits on the truck, this is taken from the rear facing forward, from the entry door.

Here it is from the front facing backwards towards the door

starting at the back, just inside the door on the drivers side is a massive 220v circuit breaker box and master AC on/off switch.

The whole thing is encased in an acrylic cover that unlocks, and a smaller acrylic flap that swings open to access the small breakers.

I will have to figure out what all this means

Below that connected to both the ac breaker box AND the outside shore power socket is a large transformer of some kind, NO CLUE what purpose it serves ( ideas??? ) [on the right]

here is the only identification plate on it

continuing forward on the driver side is a large desk with rubber top surface.

The desk has overhead racks the full length with lamps and track locks for the ceiling, walls, and floor

all the drawers push button release, the top two (left and right) have some kind of stone or ceramic surface

that lifts on a hinge to access the rest of the drawer with a rubber mat in the bottom

all the drawers are the same size, about 4 inches deep, except the bottom two on the right (forward) side, they are about double height or maybe 6 inches.

Now reaching the forward wall on the driver side is another panel that eludes me. The plate on it only says "zusatzlüfter 24v" which I translate to mean "auxiliary fan" so I am guessing it is some kind of small air filter system separate from the heater.

Forward wall center bottom is the big money. A large Webasto diesel heater that feeds it's air into perforated wall sections running down the length of both sides of the shelter. Literally the walls breath hot air. It gets it's diesel from a Jerry can that is placed inside a sealed box with it's own exterior vent and drain. a special adapter is sealed onto the opening of the Jerry can and lets the heater drink.

The Webasto identification plate

Forward wall passenger side is the 24v breaker system. It feeds 24v power strips down both sides of the shelter.

Forward on the passenger side wall is a large rack, at the top is a huge 220v AC to 28.3v DC converter. It gets it's AC from the AC breaker box inside the door on the drivers side, and feeds DC to the DC breaker box right next to it.

This thing is a monster, and we are very excited about having it. We'll get as many 24v appliances as we can for our camper, use this thing for shore power, and when we get back to the states, all we need to do is replace it with a 110v to 24v converter, and we are golden. Looks like it provides roughly a kilowatt of DC power.

at the bottom of that rack is a seal battery box with cables to the 24v breaker box.

and oh look, batteries, large 100amp/hour batteries. I am sure they are dead, but at least no core charges (can you recondition batteries? ...I think so)

moving rearward down the passenger wall is another smaller desk with the same overhead racks, no drawers, and a rubber topped surface

at the back of the passenger wall, just inside the door on the right (passenger) side is a panel in the wall that I believe was to originally allow phone or some kind of telecommunication setup through the wall, since similar posts can be accessed there from an outside hatch.

We also got a ladder, more like stairs, with folding hand rail that matches up perfectly with the hand rail on the inside of the door.

So...there is our shelter "walk-through". Anyone with any information on the appliances inside this thing, I would love to know more specifics. We are very happy with it and look forward to stripping the inside and seeing what we can make of it