Mercedes 2626 AK 6x6

Moderator: Moderatoren

Nachricht
Autor
Benutzeravatar
pairospam
süchtig
Beiträge: 932
Registriert: 2010-11-22 14:27:25

Re: Mercedes 2626 AK 6x6

#1261 Beitrag von pairospam » 2025-07-05 5:42:16

Hello again, guys:

Hmm…maybe a book might not be a good idea, at the moment. Let’s see if I finish this thing before.

Anyway, thanks for the encouragement, Härry and Marcus.

Well, it has been a very busy time in regards of my regular job. And… harder times ahead.

The winter arrived, as every year, although this has been a very mild season, so far. Pretty cold days mingled with rain and a pale sun shining low on the horizon.

Inside the shop, while it rained outside, the work turned hectic when Ramón, Gabriel and I were all three working simultaneously with steel and throwing smoke and sparks all around. The bikes had to be carefully covered to avoid any damage from the sparks. It was a noisy mess, but it was necessary.

21 879.jpg

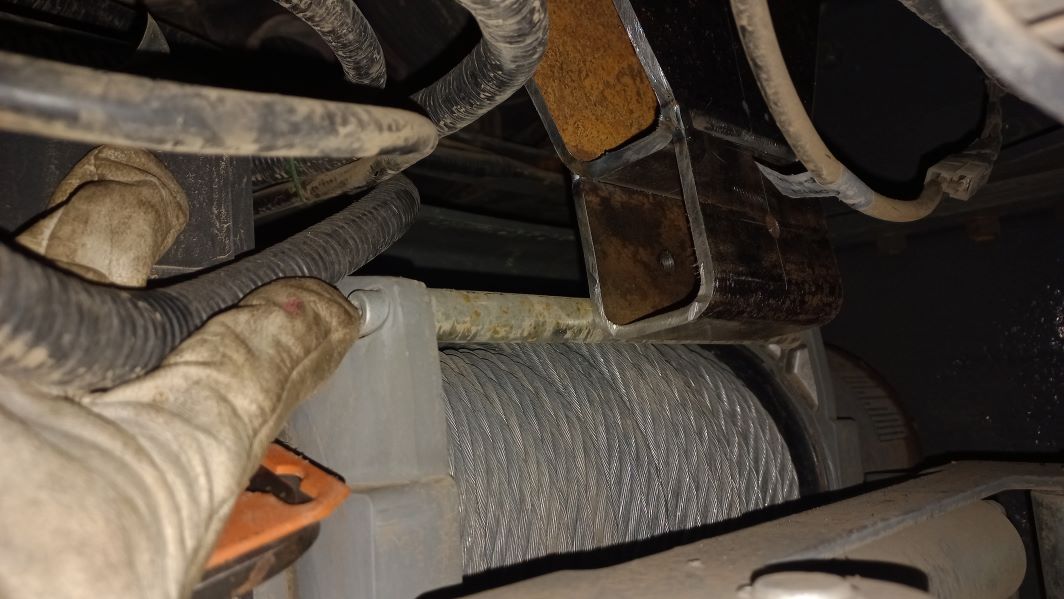
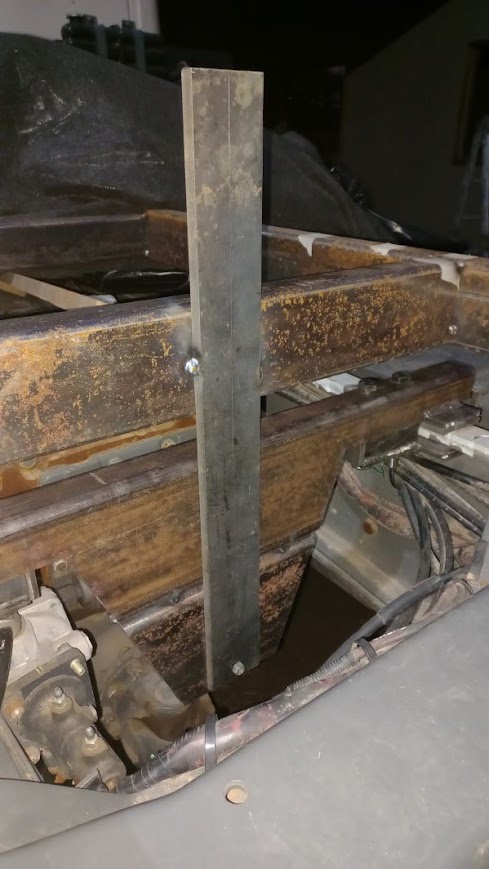
From the metal sheets collected at Verardo’s workshop I extracted some pieces needed for the brackets of the subframe. I decided to put to the test the whole thing before building it seriously, so I drilled 8 milimeters holes to let the structure lean on such delicate pivots to see if they held. In that case it would be apparent that the actual pivoting points of the frame were the exact ones, and I could go for the serious building from then on.

As part of the ceremony, it took me quite a while to align perfectly the pieces and to clamp them to the frame and the subframe.

21 881.jpg
21 883.jpg

Seems I got inadvertently another dog to grow the crowd.

21 884.jpg

The rear crossmember had to be the last to be welded to the subframe as it had to be precisely aligned with the crossmember bolted to the frame of the truck, and that meant that the central pivots should be stable, and so its installation had to be left for a later moment.

21 885.jpg
21 887.jpg

Gathered the M14 bolts and nuts I collected during all these years to select the better ones to use in the making and bolting of the crossmembers, and it was quite a lot although they were all too short. Hmm…

21 889.jpg

I was at it when Gabriel told me that there were a few cracks on the paint of the walls of the house that had to be dealt with, and as he and Ramón would not be available during the next days, it was Pairoa the one that had to deal with the issue, and quickly, as the forecast menaced with another rainy weekend. It was necessary to seal the cracks on the walls and re-paint the whole house.

So, I went out to buy a long, long, long telescopic ladder as it was not possible to use the tricky ladder I momentarily assembled for dealing with the panels and the manual winch of the roof of the shop once upon a time.

21 891.jpg

I spent that afterrnoon and the whole next morning at the task of repairing the supposedly infallible covering of the walls, applying a lot of urethane compound to seal the cracks that would have allowed the water to come in and cause catastrophic damage to the wooden panels the house was built with. Painting would have to wait.

And it rained, of course. And then the ice came, but fortunately it was not that bad, though the warning sign of the bike did not stop blinking while going from home to my job. Praise BMW for the heated motorcycle grips.

21 893.jpg

The sun shone at times warming the earth and the hearts, and Ramón went on with the roof of the kennel, dressed up like an only child under his welding gear to keep up with the cold of the evening.

21 895.jpg

Benutzeravatar
pairospam
süchtig
Beiträge: 932
Registriert: 2010-11-22 14:27:25

Re: Mercedes 2626 AK 6x6

#1262 Beitrag von pairospam » 2025-07-05 5:53:45

At my request he inspected the crossmembers I was building and suggested to reinforce them with additional steel, even if it seemed that it was okay. It never harms to be on the ultra safe side.

21 897.jpg

I followed his advice and went on with the building of the front crossmember. This piece would go gripped to the upper upper flange of the frame beams of the truck by bolt-driven brackets. The design of the brackets was a little tricky and I wanted to make them very tough and precise though easy to install.

21 899.jpg

Working with 8 mm-thick steel was relatively straight forward, as to cut and weld it was easy and with not too much heat deformation, but still there was some, which made the process a little boring as some corrections with lime and powergrinding on the brackets were needed.

21 901.jpg
21 903.jpg
21 905.jpg

I thought I reinforced them enough to withstand the forces they should resist, and much more, you know… that Godzilla stuff. I was happy with how they looked and how they worked, in the end.

21 907.jpg
21 909.jpg

A few days passed and I could not touch the pieces because I had no time left, and a new cargo of steel tubes and profiles came and were prepared to be used in the roof of the kennel and to rebuild the gate of the entrance. Ops.

21 911.jpg

There was one thing that bothered me since I reviewed some of the pictures when I declared the Merkabah, the truck, ready: the headlights. They looked so pale, and they did not illuminate too much.

I made a quick stop at the classic tool shop, and I spotted some LED lamps in the display cabinet, and they had 12-24V written on the side of the box. I got a pair and later, on arrival, made a test by swapping only the left headlamp. The difference was quite noticeable, so I put the new LED lamp on the other side too and went in for dinner.

21 913.jpg

Eduardo warned me that there would probably be some interference with the radio reception due to the LED lights, but I would have to wait before finding out.

And the cold and the rain and a little snow went on, cleaning the atmosphere and giving beautifull views of the countryside and the nearby mountains that I love so much.

21 915.jpg

Benutzeravatar
pairospam
süchtig
Beiträge: 932
Registriert: 2010-11-22 14:27:25

Re: Mercedes 2626 AK 6x6

#1263 Beitrag von pairospam » 2025-07-05 6:12:41

Finally, I had some time to take the crossmember and made some reinforcements here and there until it was ready to be mounted. I went to a rubber-to-metal bonding workshop that I used to go before and got some pieces of high-density rubber for the brackets from the owner who, after some years, still remembered the project I was in.

21 917.jpg

I took the welder to the side of the Merkabah again and tack welded all the pieces held until then by the C-clamps. I measured it all again making sure it was all still aligned and straight.

21 919.jpg

Late in the evening I installed, momentarily but perfectly aligned, the front crossmember on the frame. I had to move the brake servo pump to make room for the bracket to be applied, as it stood in the way. It should not have been a big deal, but now the access was pretty difficult with all this metallic stuff hiding it from sight and reach.

One of the reasons the design of the rubber mounted subframe was abandoned was the fact that the access from the side of the truck to the stuff in between the rails would have been completely blocked, making repairs, inspections or servicing pretty difficult.

Finally, with the subframe fixed to the frame by the central pivots, I aligned and tack welded also the rear crossmember that would hold the rear pivoting bracket.

It was pretty late and cold and Carmen went out and shouted some quite menacing words that I could not understand, but I got the message, so I took a quick picture to show the frame with no C-clamp attached to it, made order and went inside for a welcomed hot cup of tea.

21 921.jpg

The next weekend began by gathering the pieces I would need for cross lifting the axles to bend the frame and see, again, how it behaved.

I got the hydraulic jack and a lot of pieces of wood to play with, under the attentive look of Trump that missed not one of my movements.

21 923.jpg

I also borrowed from Marco, Eduardo’s cousin, an IBC tank to apply some load on the frame, as planned before.

21 925.jpg

After a couple of thousand strokes, I finally got the truck on a stump and a stand, twisted enough as to lift the right wheel of the third axle.

21 927.jpg
21 929.jpg


The longitudinal pivoting axles of the frame remained the same as measured while the Merkabah was on Eduardo’s workshop, far in the depths of the frame at both the front and the rear.

21 931.jpg
21 933.jpg

Sorry, but I cannot correct the orientation of the vertical pictures.


Eduardo gave me a hand, and we placed the water tank on the frame, right on the center of the boggie.

21 935.jpg

Benutzeravatar
pairospam
süchtig
Beiträge: 932
Registriert: 2010-11-22 14:27:25

Re: Mercedes 2626 AK 6x6

#1264 Beitrag von pairospam » 2025-07-07 3:41:51

Bild

I connected the water hose and began to fill the tank with the precious liquid we praise so much in the summertime.


Bild


As the filling rate was not very fast the evening came, and it became progressively darker and cooler. I did not want to make any measurements with the light of the phone, so I wrapped the whole thing and left for another cup of tea and a big glass of milk and banana.


Bild


The next day arrived with a bright sun and a clear sky. The Merkabah seemed not to protest her ballerina-like attitude and her unlikely coat.


Bild


And, of course, the measurements did not change a bit. Probably one or three tons would make no difference for a frame made to withstand 26 tons, so I took the numbers for certain and began the not very encouraging task of emptying the water tank and remove it and the stump and the stand from under the axles. Pretty boring.


Bild


Fortunately, the ¾ HP pump made emptying the tank much quicker and pretty clean. Unfortunately, the water went directly to the ditch.


Bild
Bild


After putting all the wheels on the ground, I took the crossmembers out and began the marking and the cutting to stretch them with other pieces of 150x50x5. But, again, it was late and cold, and I had many things to do in the next days.


Bild


The next morning, it was cold, really cold, at least for the local standards.


Bild
Bild


When taking the bike out of the shop, breathing heavily the chilling air, I put the brain at work and decided to put the subframe to the test before doing the serious welding and installing the definitive bushings. So, I would use other M8 bolts as longitudinal pivots and stress again the frame to see if they held. If they did, there would be absolutely no doubt that the measurements were the right ones and I would be able to put anything on the subframe an it would not suffer any shear force.

Benutzeravatar
pairospam
süchtig
Beiträge: 932
Registriert: 2010-11-22 14:27:25

Re: Mercedes 2626 AK 6x6

#1265 Beitrag von pairospam » 2025-07-07 4:19:00

When I could, I resumed the work and cut and drilled the rest of the pieces of the rear crossmember, tack welded them and tried to put the big and heavy thing in place. Unfortunately, the winch was in the middle, as expected when the pivot point was so deep down.


Bild
Bild


I unscrewed the winch and kicked it as back as I could. That gave the exact amount of space to place the crossmember and the head of the M8 bolt. I would think on how to fix the winch issue later.


Bild


Then, I repeated the operation with the front crossmember, which was only 27 cm deep and did not require an additional piece to get to that level.


Bild


Meanwhile, Gabriel was charged with the repairing and the painting of the the walls and the window frames of the house. In a fine gesture he covered the new ladder with plastic not to stain it with paint. As the maniac I am, it was really appreciated.


Bild


In the afternoon, I cranked the mighty V8 and waited for the air pressure to build up for levelling the frame of the Merkabah to align the crossmembers and the subframe perfectly again. Then, tack welded some long pieces of steel that would act like the front and rear brackets of the subframe.


Bild
Bild
Bild


Put just a couple of welds to fix them, with a long lever. In case there were still big stressful forces the weldings or the bolts would give. Then, wrapped the back of the truck and enjoyed a nice meal as the day came to its end.

The very next day, yesterday actually, my father paid us a visit after quite some time, and he accompanied me to the dry riverbed to see if the whole thing was able to tolerate some abuse without braking apart.

And the Merkabah once again went to play. I drove her to the same spot where she twisted to maximum. My old man had some difficulties going down the cabin because it was very high… and he is already 81. We are not the same at 81, guys.


Bild


The frame spiraled under the tension, much more than when jacked up, but the subframe kept perfectly straight.


Bild
Bild


Success. It was all okay. The weldings and the bolts stood and nothing broke.


Bild


The serious building could then begin.

Benutzeravatar
macherknox
abgefahren
Beiträge: 1334
Registriert: 2014-07-07 15:51:11
Wohnort: Wedel

Re: Mercedes 2626 AK 6x6

#1266 Beitrag von macherknox » 2025-07-07 13:13:00

Hi Pairo,

I'm following your work now for quite a while, great to see progress and you're only xxx away from the first camping trip.

Best regards
Max

landwerk
abgefahren
Beiträge: 3190
Registriert: 2006-10-03 18:13:47
Kontaktdaten:

Re: Mercedes 2626 AK 6x6

#1267 Beitrag von landwerk » 2025-07-07 15:40:15

Dear Pairo

I think you need a second fulcrum at the middle of the long sides of the frame (the sides form the front to the back of the vehicle) to avoid strain while twisting.
While twisting the main frame, one of the fixed point at the middle of the long sides will move forward and the other backwards.
This requires a lever with two pivot points in the middle oft the long sides of the frames .

Try in a little model first.

Then you will see how the levers work and move in different directions between the frames while Twisting the main frame.


Liebe Grüße


Oli

Benutzeravatar
Pirx
Säule des Forums
Beiträge: 17901
Registriert: 2006-10-04 20:03:38
Wohnort: Raum Stuttgart
Kontaktdaten:

Re: Mercedes 2626 AK 6x6

#1268 Beitrag von Pirx » 2025-07-07 15:55:08

landwerk hat geschrieben:
2025-07-07 15:40:15
Dear Pairo

I think you need a second fulcrum at the middle of the long sides of the frame (the sides form the front to the back of the vehicle) to avoid strain while twisting.
While twisting the main frame, one of the fixed point at the middle of the long sides will move forward and the other backwards.
This requires a lever with two pivot points in the middle oft the long sides of the frames .

Try in a little model first.

Then you will see how the levers work and move in different directions between the frames while Twisting the main frame.


Liebe Grüße


Oli
The concept described by Oli works well, but is not very common.
Alternatively, the center pivots can stay fixed. But in that case, the front and rear pivots must enable a certain movement in longitudinal direction. Which, I think, you Pairoa already had in mind ... :D

Pirx
Der mit der Zweigangachse: 15 Vorwärtsgänge, 3 Rückwärtsgänge, Split, Schnellgang, Differentialsperre
---
"Immer bedenken: Hilfe ist keine Einbahnstrasse, Geholfen-Werden ist kein Recht und es liegt an jedem selbst, inwieweit er sich hier in der Gemeinschaft (die im Extremfall so einiges gemeinsam schafft) involviert und einbringt."
Ein Unimog-Fahrer.

Antworten